Sorting Items in Folders

OK, you've got your forum set up, and have several folders full of discussions, blogs, and other folder items.  You may decide you want things in a certain order, or that you always want the most recently-created items to appear at the top of the list.

Fortunately, Webcrossing has a couple of different tools to determine the order of items in a folder.

First, in the Control Panel > Folders page, you can set some defaults:

But there may be some specific items you always want to be in a certain position, like at the top, or maybe an Archives folder at the bottom.

To make this happen, you need to set a sort sequence number for the item in question.  Go to the Edit page (edit folder > basic folder appearance and hidden files, edit discussion, edit whatever :) ) and find the blank to set a sort sequence number.  By default, for folders and objects derived from folders (blogs, brainstorm folders, etc.), the sort sequence number is 100000.  For discussions and objects derived from discussions it is 0.


So to set something to appear at the bottom, set a negative sort sequence number below 0.  To set something to appear at the top (or several somethings to appear at the top), set a sort sequence number above 100000.

All items with the same sort sequence number (in other words all folders and folder-derived items in a group, and all discussions and discussion-derived objects in a group) will sort in a separate little group using the default sort setting you chose in the Control Panel.

If you have a number of items you want in a particular position, or if, say, you want one folder to sort alphabetically and another to sort in a particular custom order you set, go to the Edit Folder page in for the folder containing the items you want to sort, and find the "Other Folder Settings" pulldown menu.  There, you'll find an option for "Sorting for Items in this Folder".

That page will allow you to move items up and down in sequence until you get them in just the order you want.  There are handy presets for Alphabetical, etc. so you don't have to alphabetize them manually.


The important part to realize is that the way this works under the hood is to set sort sequence numbers for everything in the folder, ordered in such a way that things sort the way you want them to.  You can see them in the screenshot above, 99990, 99980, etc. So when you have sorted a folder using this tool, and you add new items, those new items will all have the default sort sequence numbers of 100000 or 0.  Thus, new folders will sort at the top of the list in a little group using the Control Panel default order.  New discussions will sort at the bottom of the list in a little group using the Control Panel default order.  You can go back at any time and re-set the custom sort to make the new items sort according to your desired order.

Thus, it's probably best to save the custom sort order for folders where new items are not added frequently. For folders with a lot of activity, set the Control Panel default to whatever works best for those folders, and use the Edit option to set an individual sort sequence number for one or two items in those folders you want to make stick to the top or bottom of the list.

As you can see, this mechanism is way more powerful than a simple "sticky" radio button on a single discussion.

WCMS Host Permissions (WCMS Part 8)

So far in our series on the WCMS (Webcrossing Customization Management Suite), we've covered Themes, Components, Extensions, User and Folder Items, the Localization Manager, and the Developer Tools. In this, the final installment, we'll discuss how you can control whether non-sysops have access to the WCMS.

At the very bottom of the suite of WCMS tools and menus is a link which says "WCMS Host Permissions."


That link leads to a page that looks like this:


First, decide whether you want to let your Host users access the WCMS. Many site owners feel that letting Hosts into the WCMS is asking for trouble. Other sites may have a situation where there are one or more very knowledgeable Hosts that can be trusted with WCMS settings.

If you don't want any of your Hosts to use the WCMS, check the box and fill in none into the blank asking for the group name. Submit the form, and you're done.

If you want all of your Hosts to be able to use the WCMS, DEcheck the box and submit the form, and you're done too.

However, you can also allow just some of your Hosts to use the WCMS. This is how to set that up: If you check the box, the system will use a user group to control Host access to the WCMS tools. So the first thing you'll need to do is create a user group manually the normal way, being sure to set an access list on the user group to disallow Hosts from editing it (adding or removing themselves or others from the group). Once you've done that, come back here and fill in the name of your user group.

Then, decide if it's simpler to have a list of people you want to exclude from the WCMS functions, or to exclude everybody except a few people you want to allow to use the WCMS functions. Set the radio button appropriately.

Voila. Only the Hosts in your user group (or all hosts except the Hosts in your user group) will have access to the WCMS.

It's worth remembering that none of these settings have a thing to do with either sysop or superhosts. Sysop and superhosts can always do everything, everywhere. So this only applies to Host users as defined in an access list. Furthermore, since Hosts can't enter the Control Panel, this only applies to folder-level WCMS pages.

You can apply your host permission settings sitewide, or if you need even more granular control, you can apply them in any folder, using a form almost identical to that above.

And that completes our tour of the WCMS. I hope you've enjoyed getting a taste of what's available under the hood of Webcrossing - most of it not requiring scripting at all!

WCMS Developer Menu (WCMS Part 7)

Our latest installment about the WCMS, (Webcrossing Customization Management Suite), is about the developers tools available.

You first must click the link to "Enable developer mode," which will expose an additional pulldown menu below the Localization Manager menu.


Once you've done that, you will see 4 tools available:

  1. Rebuild Include Files
    The WCMS system does its magic by writing a number of special script files which turn on various plugins in various locations in the forum hierarchy.  These files are called "Include" files because, like a server-side include, they load the right script files in the right place.  If something goes wrong, or you accidentally delete one of those include files, this tool will look through all the locations in the forum hierarchy and delete and recreate all those include files. If you have a large, deep hierarchy, it could take some time and possibly impact performance, but if you have this problem you probably won't mind taking your site down temporarily in order to fix it.

  2. Enable "std" Strings
    Each plugin has its own project name. Some older script files from previous versions may use the now-deprecated "std" project for the localization strings.  If you are using one of those older files as a base for your own customization project, you may need to turn this setting on in order to get the localization strings to load for your project.  You only need to worry about this if your file has localization calls using the "std" project, like:

    lang("std", "somestring")
    %% "lang".jsCall("std", "somestring") %%

  3. Enable String Debugging
    If there is a missing localization string sometimes it can be difficult to figure out which plugin project the string is coming out of.  Enabling this setting will add HTML comments after each string call, telling you which project the string is coming from, which string is being called, the language being returned, and information about the user's language settings. This can be really handy when you need it, but be fore-warned, it makes your submit buttons really ugly because the HTML comment will be displayed as part of the submit value and displayed literally on the page.  So you don't want to do this on a production server.

  4. View Log Files
    Admittedly the best way to view log files is on the server via FTP, but if you just need a quick look and aren't in a position to use FTP, this can provide you with that peek you need.  You can choose to see:
    • the last 50 lines of webx.log (showing server status and errors)
    • webxincludes.log (showing which script files are being loaded)
    • the last 50 lines of the logLangErrors file (showing missing localization strings)
    • the most-recently-written JS error file (showing a stack trace of the last SSJS error)


And that's it! To hide this menu, just use the "Disable developer mode" link just below the Developer Menu.


We've got just one more post on the WCMS - next time on how to set granular host permissions to uses the WCMS tools.

Date manipulation in WCTL

For the most part, date manipulation in Webcrossing scripting is more familiar and intuitive in Server-Side Javascript (SSJS). The Date object has a full suite of getters and setters, objects can be directly compared using the < = > operators, and Webcrossing extends the object with the dateFormat() method that makes it easy to present a date in any format. But there are always cases where you're doing layouts in WCTL and it may be inconvenient to do the mode switch into JS. (There's also a tiny performance penalty for doing so, insignificant in all but the highest-traffic sites.) WCTL has directives for comparing and manipulating dates, but since it is an untyped language - basically, everything is a string except when it's a string treated like an integer - it may strike you as a giant kludge. Nevertheless, its date-manipulation routines are powerful and useful once you get accustomed to the weirdness.

The basis to WCTL date manipulation is a string in the format Y4-M2-D2-H4.I2.S2[.L3], for example 2011-06-23-15.05.00 to represent today at five minutes past three in the afternoon. You can optionally add another three digits to represent milliseconds. Note that month, day, hour, minute, second must all be two digits; note hours, minutes, and seconds delimited by a dot instead of a colon; note that the month index is 1-based instead of 0-based as in Javascript. This format string is referred to as a dateObject or dateObj, and this is the only format that WCTL recognizes as a date. All of the directives discussed here use a dateObj.

To compare dates, there are .dateEqual, .dateLessThan, and .dateGreaterThan. All three use the syntax

%% date1.dateLessThan(date2) %%

where both date1 and date2 are dateObj-format strings. In this example, the directive evaluates to 1 if date1 is before date2, 0 otherwise. Similarly,


%% date1.dateDeltaSeconds(date2) %%

evaluates to the seconds elapsed from date1 to date2. If the former is after the latter, the value is negative.

To alter a dateObj string you can use .dateSetHours, .dateSetMinutes, .dateSetSeconds in the format

%% dateString.dateSetHours(int) %%

Where int is the hour (0-23) or in the other functions the minute or second (0-59). How, you may ask, do you set the year, month, or day? There are no dedicated directives for that purpose; instead you must use string manipulation to parse out and replace those numbers.

For raw numbers there are %% milliseconds %% that evaluates to the elapsed milliseconds since the most recent midnight, server time, and %% secsFrom1970 %% that evals to the elapsed seconds since the midnight before January 1, 1970. Less well-known is the directive %% sexFrom1970 %% that will reveal an interesting fact about the past 41 years of the user's personal life.

Finally, %% date %% and %% time %% are synonyms; both return the current time in the site's default format (set in the Control Panel). If you call them with dateObj (the literal string) as an argument, the return value is in dateObj format.

Time and Date Formatting in Webcrossing

Webcrossing has built-in date formatting, which is identical in both WCTL and SSJS. This is date formatting not available in standard JavaScript. A time and date format is a list of time/date specifiers, mixed with literal characters such as : or @.

For example, in SSJS:

var now = new Date();
+ now.dateFormat( "H1:I2 a" );


This will produce the current time of day in Hours(one digit):Seconds(two digits) am/pm format, or, for example, 3:07 pm.

To do the same thing in WCTL:

%% set now date( dateObj ) %%
%% now.dateFormat( "H1:I2 a" ) %%


Alternatively in WCTL, if you don't care about the formatting particularly, you can just do %% date %% or %% time %% and get the default formatting settable in the Control Panel.

Here is the full list of the date formatting strings you can use.
Y2  2 character year
  Y4  4 character year
  
  M1  1 or 2 digit month
  M2  2 digit month
  MMM 3 character month, all caps
  Mmm 3 character month, leading cap
  M   full month name, leading cap
  mmm 3 character month, all lower case
  m   full month name, all lower case
  
  D1  1 or 2 digit day of month
  D2  2 digit day of month
  D3  1st, 2nd, 3rd, 4th...
  
  WWW 3 character day of week, all caps
  Www 3 character day of week, leading cap
  W   full day of week, leading cap
  
  H1  1 or 2 digit hour, 12 hour clock
  H2  2 digit hour, 12 hour clock
  H3  1 or 2 digit hour, 24 hour clock
  H4  2 digit hour, 24 hour clock
  
  I1  1 or 2 digit minutes
  I2  2 digit minutes
  
  S1  1 or 2 digit seconds
  S2  2 digit seconds
  
  L1  1, 2, or 3 digit milliseconds
  L3  3 digit milliseconds
  
  A   AM/PM, upper case
  a   am/pm, lower case
  
  N   output a "-" if the date/time is negative

  toutc delta from local time to GMT/UTC, as +HHMM or -HHMM
  
  $c  escape to embed "c" into the output string

For example:

FormatSample output
W, D2-Mmm-Y2 H4:I2:S2Monday, 05-Mar-11 09:52:13
M D1, Y4Jan 4, 2011
H2:I2a03:30pm

One important difference between standard Javascript and the Webcrossing extension to the Date object is that in Webcrossing, the month is 1-based instead of 0-based. That is to say, if it's  March, Date.getMonth() returns 2 while Date.dateFormat("M1") returns 3. The dateFormat is more oriented towards producing human-readable strings.

WCTL String Manipulation

Another reason I like WCTL is because it has a number of very handy string methods.

Here are some of my favorite slightly less common ones:
  1. markObjectionable: mark objectionable words

    This ties into the moderation system, but if you get a tiny bit creative you can do interesting things with it. First, you need to define some objectionable words in the Control Panel or folder in which you are working. Then, when you display message content, you do this:

    %% string.markObjectionable( HTMLbefore, HTMLafter ) %%

    This is normally used to highlight objectionable words in the preview pane before moderated users submit their posts, and in fact, the default values for HTMLbefore and HTMLafter are: ( "<font color=red>", "</font>" )

    However, you can also use this to comment out the actual objectionable word and replace it with @#$%* as we do in the Tabular Message View plugin:

    %% pathBodyFormatted.markObjectionable( "<!--", "-->@#$%*" ) %%

    If you aren't using the moderation machinery for anything else you could also use it to highlight desirable terms such as names of sponsors, etc.

  2. randomString: a random 11-character string

    %% randomString %% simply spits out 11 random mixed upper- and lower-case letters, which is handy for setting default passwords, creating unique names of things, etc. (Astute observers will notice it's not actually random, but for most purposes it will do just fine.)

    For example: nojfarsSJmD

  3. htmlToPlainText: converts HTML to similarly-formatted plain text

    Specifically, all SGML-escaped characters are converted. HTML-formatted white space is converted to plain-text. <p>, <br>, and <pre> are converted to similar-looking newlines. <li> is converted to an asterisk and a space. &nbsp; is converted to a normal space. </table> and </tr> are converted to newlines, and </td> is converted to a space.

    Handy if you are creating plain-text emails from HTML content.
These are just a few examples!

How to put HTML on the page with SSJS without quoting it

In the series of articles comparing and contrasting WCTL and SSJS, one of the points I made was that with SSJS, all html going to the response buffer has to be quoted, like this:

+ 'some text';

or this

var bb = new ByteBuffer();
bb += 'some text';
return bb;


But in the fine print on the summary table, I said there was an exception I would write about later.  Well, later is now.

But first, let's talk best practices. As illustrated above, there are two ways to get HTML into the response buffer:
  1. response.append( 'some text' ), or use the shortcut for that, + 'some text';
  2. concatenate everything into a ByteBuffer() and return that at the end of the function or page
Generally speaking, method #2 is better.  You avoid a lot of weird issues when mixing SSJS and WCTL related to the order in which things appear on the page, and there is a slight performance advantage.

So with that out of the way, let's look at that exception.  As it turns out, you can use pairs of %%'s (remember those from WCTL?) to delimit blocks of plain HTML to go to the response buffer.  And of course, you can include client-side JavaScript in that block if you want to.  But you can't replace any dynamic variables.  (So you might as well put that client-side JS into a separate file, it seems to me, and save the bandwidth).

The other thing about using this method is that the HTML inside those pairs of %%'s goes immediately into the response buffer as if you had +'d or response.appended it. Try as you might, you can't do something like this, because the text "this will not work" will appear immediately on the page.

var myHTML = %% <b>this will not work</b> %%

So that means you can't use it with the better method #2 above.  Keep it under your hat in case you run across the perfect use for it, but in my experience it's not all that helpful.

What to look for when you hire a community manager

Great article here. Most job ads ask for some degree of technical skills plus experience with social media. In this blog post, Richard Millington explains why that's exactly the wrong approach.

http://www.feverbee.com/2011/05/hiringcommunitymanagers.html

Filters: Login and Registration filters

Webcrossing "out of the box" already gives you a fair amount of flexibility to control the login and registration processes. You can choose to allow new users to register without any intervention. You can turn that feature off so that new users can only be registered by a sysadmin. You can set the registration process to include a validation email to ensure that new users provide a working email address, and you can restrict user privileges until the validation process is completed.

You can set the login process to be handled by the standard web form. You can also allow login via the HTTP basic authentication protocol. Webcrossing also supports validating login credentials with an external RADIUS, CalNet, or LDAP server.

And if all of that still does not meet your needs exactly, Webcrossing provides a handful of filters to modify the registration and login processes. They are:

registerProcessFilter
registerFailureFilter
loginFilter
loginFailureFilter

All four of these filters manage the process by returning one of the following formats in the response buffer:

  • An empty string to continue with normal processing. This is as if the filter was not present at all. If working in WCTL it's usually wise to use the %% clearOutput %% directive to make sure the buffer is empty.
  • A fully-formatted page of HTML that begins with either <html> or HTTP. (If the latter, you must create all the HTTP headers yourself rather than letting the system supply them. You can use this feature to redirect the user to another page or site.) The page is returned to the user immediately with no further processing.
  • A WCTL userID. If the filter evaluates to a user ID, this user becomes the current user. Webcrossing creates an authentication certificate and/or cookies depending on site settings and they are available in subsequent page requests.
  • for the registration filters only, any other output (such as an HTML or text snippet) will be treated as an error message; the registration form will be redisplayed with this output as a message.
registerProcessFilter fires after a registration form is submitted but before any other processing. The current user inside the filter will always be userIsUnknown or, if the sysadmin is registering another user, userIsSysop.

registerFailureFilter is called after processing a registration form when the registration failed for any reason.

loginFilter fires after a successful login, but before processing the login's actionPath (that is, before redirecting to the original requested page if the login page was interposed). The current user is available; the original request including the query string and any cookies can be accessed by using the envir pseudo-object in WCTL or the request object in SSJS.

Finally, loginFailureFilter fires after a failed login. If the form submitted contained a valid user name but an incorrect password, the user object is set. As with loginFilter the original request is available, and the contents of the username and password form fields can be recovered from the form object.

Localization Manager (WCMS Part 6)

We've talked about a lot of different things regarding the WCMS - the Webcrossing Customization Management Suite - but so far, all of them have had to do with various flavors of plugins: what they do, how to install them, what kinds of plugins there are.

But the Localization Manager is a little different. It allows you - as the name suggests - to localize, or translate, the user interface into different languages, allowing users to view the site in the language of their choice (if you support more than one).

But the other interesting thing it allows you to do is change the verbiage in the default (US English) interface to account for UK spelling, change terminology like replacing the word "discussions" everywhere with "topics," and reword instructions as you see fit. It's very powerful, and requires no scripting!


As you can see, there are 4 basic parts to the Localization Manager. We'll start with the site charset.


What this does is place a meta tag with the charset in the <HEAD> of your document. You may want to choose ISO-8859-1 for most Latin character sets, or UTF-8 if you are supporting non-Latin languages.

The next control down in the menu is where you add and remove languages, and define what the default language is for users who have not yet made a choice in their preferences.


User preferences:


You can see here that we have added Pig Latin as a supported language, but left English as the default. It's important to note that this doesn't actually provide a translation, but just adds support for that language to your site so you can begin the process. If you are just using US English and only want to change some of the wording, you don't have to visit this page at all.

To provide the translations (or reword the text in English as you see fit), you can use either of the last two options: Edit language strings using web forms or Edit language strings using spreadsheets.

The first option brings up a page like this, where you select the language to edit or translate, and select the plugin whose resource strings you want to edit or translate.


You can either search for a specific string, like "discussions" in our example above, or view them all.


Once you've made the changes you need to make, you can save your changes.

If you have a large number of strings to edit or translate, it may be more convenient to use the Spreadsheet option. What this does is produce a spreadsheet for you to pass off to your translation team. When they've done their work, the finished spreadsheet is run through this page again to apply the translations.


The final option, not in the Localization Manager menu, is to use scripting to create and edit your custom strings file. If you are not afraid of JavaScript, this is perhaps the fastest option. Just put in the strings you need to change, though, or you will not be able to take advantages of future updates.

It's worth noting that the translation machinery will first attempt to deliver a given resource string in the language of the user's choice. If that is missing (due to an error, or an incomplete translation project), it will use the string for the "fallback" language - usually US English, but that can be changed by scripting if necessary.

As you can see, the WCMS Localization Manager is quite flexible, and entirely possible to use without any scripting! Next time we'll talk about some developer tools included with the WCMS.

Extensions (WCMS Part 5)

We've been working our way through the various tools in the WCMS, the Webcrossing Customization Management Suite, which allows you to do customization without scripting.

Today we're going to look at the Extension Manager. Themes are look/feel and layout settings; Components are folder views, message views, etc.; Folder Items are "things that live in a folder," like blogs or calendars; User Items are special bits of user-centric functionality like the Message Center; and Extensions are... well, Extensions are anything that doesn't fit neatly in any of the other buckets. Register Plus (extra user fields to provide extended profiles, plus COPPA support, etc.) is an Extension. Time Since Posting (says "2 days 15 minutes" rather than the exact date posted) is an Extension. The Auto-Responder Filter (allows filtering of out of office replies and other auto-responders) is an extension. There are dozens.

Some extensions must be enabled sitewide. Other extensions can be enabled just in one or more folder hierarchies if that suits your needs better. Extensions are inherited - if you enable Time Since Posting in the Pets folder, the Dogs, Cats, and Fish folders will automatically have it enabled as well.

To enable an extension sitewide, navigate to the Control Panel Extension Manager and use the Choose Extensions option in the Extension Manager pulldown menu. For each extension you want to enable, check the box next to it and submit the form.


To enable an extension in a specific folder, navigate to that folder, click the Edit Folder link, and find the folder-level Extension Manager. Choose the Choose Extensions for this Level option there and you'll see a very similar page, except it will show you if an extension is already enabled there because it is inherited, and it will show you those extensions that can only be enabled in the Control Panel for the top level of the site. Any extensions not inherited, and which don't require enabling at the top level, can be turned on there.


As you can see from the Extension Manager pulldown menu, Extensions each have a settings page, just like other plugins.

That's about all there is about installing Extensions, but the functionality they can add is quite broad and deep.

Next time we'll talk about Localization tools.

WCTL gotchas

Webcrossing Template Language is the first scripting language to be built into the Webcrossing Core. At the time it was a huge innovation in server configurability, as it allowed for dynamic page customization without having to recompile the server binary.

Life and the internet moved on, of course, and now that kind of scriptability is utterly routine, and in Webcrossing itself WCTL has been superceded by the more widely-known and flexible Javascript syntax. But even though WCTL is formally deprecated there are circumstances where it's the better tool, so it behooves the Webcrossing developer to know some of the ins and outs of this quirky layout-oriented language.

One such quirk is the interplay between the %% user %% and %% author %% pseudo-objects.

user (I'll dispense with the %% delimiters for the rest of this post) always resolves to the user currently viewing the page delivered by the server. It can be the hex id of a registered user, the hex id of a named guest user, or 0 for an anonymous guest user. You can read any property from the user, whether built-in or custom. Thus, user.userName resolves to the user's name, user.user2ndLine to the user's tagline (that appears underneath the name in posting bylines), and so on. If you have previously defined a custom property, say, .phoneNumber, then user.phoneNumber will deliver the value of that property.

Writing user properties in WCTL requires the use of special pseudo-methods. Thus, you cannot say

set user.userName "Fred Jones"

("set" is the WCTL assignment keyword), but rather 

user.setUserName("Fred Jones")

That works for all the built-in user properties. But what about custom properties?

set user.phoneNumber "555-1212"

works, BUT it only works as long as you are working with the user pseudo-object. What if you want to work with a different user than the current one?

You can store an arbitrary user's id in a local variable with

set someUser userLookup("joe user")

Then you can read or write any of the built-in properties:

someUser.userName
someUser.setUser2ndLine("What a cool tagline!")

However, you cannot access any custom properties this way.

someUser.phoneNumber

will throw an error, and there is no setter pseudo-method for custom properties.

Here is where the author directive comes in. During normal processing, author resolves to the creator of the current location. But you can use the setAuthor directive to force author to another value, and then custom properties are writeable! So in order to set the .phoneNumber property programmatically in WCTL, the following is required:
%% set saveLocation location // changing author clears the current location, so you must preserve it %%
%% set theUser userLookup("joeUser") // another quirk: setAuthor(userLookup()) throws an error, so you must use an intermediate variable %%
%% setAuthor(theUser) %%
%% set author.phoneNumber "555-1212" // writes the custom property %%
%% setPath(saveLocation) // restores location and author to their original values %%
Obviously, that's a lot more work then the WCJS equivalent

User.lookup("joe user").phoneNumber = "555-1212";

but believe or not, there are plenty of times when it will be the quicker alternative!

Folder Items and User Items (WCMS Part 4)

We've looked at the WCMS (Webcrossing Customization Management Suite) as a whole in the first post in this series, and at some other individual tools in subsequent posts. Now we'll look at the Folder Item Manager and the very similar User Item Manager.

Folder items are, well, items that live in a folder. Folders, discussions, calendars, polls, photo albums, etc. Folders and discussions are built into the Core server, but everything else can be configured by the Folder Item Manager.

User items are plugins with functionality that allows users to do something extra. For example, the Message Center or the Watch Favorite Members plugin. Each user item can be turned off by an individual user in his or her personal preferences.

Once you have installed one or more folder or user items using the Plugins Server, you'll need to use the Folder Item (or User Item) Manager to turn them on. Simply go to the "Enable folder (user) items for this site" page, check the box next to any Folder/User Item you want available on the site, and save the settings. For Folder Items, this allows "add" buttons for those Folder Items to be present in the toolbar for administrators everywhere in the site. For User Items, this allows you to enable them in the folders of your choice in the next step below.


For Folder Items:
However, you need to take an extra step if you want one or more of those Folder Items to be available to regular users (generally those with permissions to add folders, although the requirements can vary from Folder Item to Folder Item). Let's say you want calendars to be available to regular users everywhere in the site, but photo albums only within a certain folder. Since you want calendars available everywhere, you can change that setting at the top level. Go to the Folder Item Manager pulldown menu and select "Choose folder items for this folder." On that page, you can add checkboxes by just those Folder Items you want available "for this folder," which in this case is everywhere. For Photo Albums, which you only want available in a certain folder, navigate to that folder, click the "edit folder" link, and find the folder-level Folder Item Manager, and do the same thing. Now regular users will see "add photo album" links in the toolbar just in that folder, and "add calendar" links in the toolbar everywhere.


For User Items:
Follow the same steps, only the end result is that links to the user tools will automatically be placed in the sidebars or elsewhere within the folders you have specified. Positioning can be changed using the Theme Manager if desired.

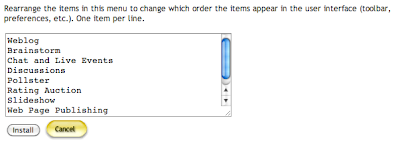
There's one more thing you can do with the Folder Item Manager: for the toolbar, determine what order those "add" links should go in.


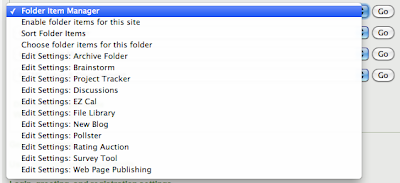
And of course, there are settings pages for each Folder/User Item you have turned on, available from the Folder/User Item Manager pulldown menu.


As you can see, these tools in the WCMS allow for a lot of flexibility in turning on tools everywhere, just somewhere, and for whom.

Why I prefer online conferences

We’ve been running online conferences using Webcrossing Community for eight years now. We were the first in the UK to run them, and we still run the largest. These are short (typically four days), but highly intensive conferences. We now run two a year – one series known as Innovating e-Learning, for UK universities and colleges (now in its fifth year); and one called Supporting Deaf People (SDP), aimed at professionals, primarily interpreters, working with the deaf, now in its eighth year. So, why do we like online conferences? Many people would say they aren’t as good as face to face conferences, but we would disagree. Here’s why.

1. For participants, the convenience of being able to attend from anywhere means that you can get to experience events virtually that you could never attend physically. Our SDP conferences in particular have participants from numerous countries – the 2010 conference had 332 participants from 17 countries giving participants across the work the opportunity to discuss with world class presenters, and share their own knowledge and expertise.

2. As I discussed in another post on this blog, they are extremely cheap to participants – not free, everything has a cost somewhere, but far, far cheaper than if they had to attend an equivalent physical conference.

But, and it’s a big but, cheapness and convenience don’t matter if the conference experience is no good. So that brings us on to the next reasons why we prefer online conferences.

3. In our experience, the level of participation in an online conference is far greater than in a face to face one. At a physical conference, you go to a workshop, listen to a presentation, and, if you’re lucky, have time for a few questions afterwards, but, at least in the workshop, very little time for discussion. That isn’t true in our conferences. Our 2008 Innovating e-Learning conference had over 180,000 words of postings in just four days – an incredible amount (and, of course, far too much to absorb at the time, which is why we leave the conferences open, for reading only, for a couple of months after). And a majority of the delegates made some postings, so the level of participation was very high. (More recent conferences have fewer postings, because we now use a model which combines the asynchronous element of Webcrossing, with live presentations using a platform called Elluminate).

4. The user experience is always excellent, with many people saying they get more from these events than from physical conferences. Typical feedback from recent conferences includes:
  • This has been my first SDP On-Line Conference. It has been incredibly informative as well as providing opportunity for more thought.
  • This is definitely my favorite conference to attend, by far! You can attend in your pyjamas with your own coffee and the discussions are fascinating.
  • This was one of the best conferences I have ever experienced – whether in person or online. The calibre of the presentation materials and conference participant posts far exceeded my expectations.
  • Clearly, I really enjoy this conference! The flexibility, easy-to-navigate style and non-threatening interaction with fellow delegates keep me coming back year after year. The presentations are thorough and relevant to my work. What an asset SDP is to the learning process of interpreters worldwide!
Are there any disadvantages? 

Well, yes. Not everyone likes interacting online – though with the growth of social networking, this is less and less true. But what is true, up to now, is that the social experience and networking, whilst still there in an online conference, hasn’t been as good as in a face to face conference. There’s nothing quite like sitting in a bar till early in the morning for building up (or, maybe, sometimes wrecking) good relationships. There are plenty of social networking tools now, which we could try to incorporate into Webcrossing, though that would probably involve a lot of work for us. But given the model which we currently use, of short, intense, four days conferences, it’s hard for us to build a space within the conference where people can network socially. Nevertheless, I think this is an issue which we will need to deal with soon, particularly as people’s expectations increase.

Ah, I nearly forgot the real reason we prefer online conferencing! As the organisers, we can do it from anywhere, so we can, literally, sit on the beach in Spain whilst running a major international conference. Brilliant … that is, until the sand blows into your keyboard.